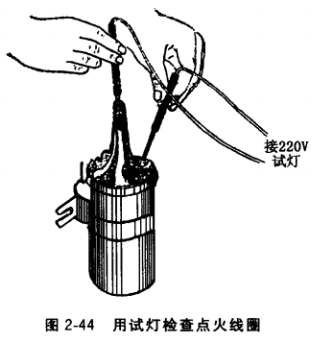
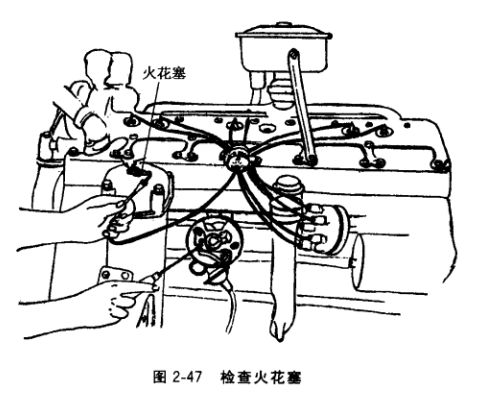
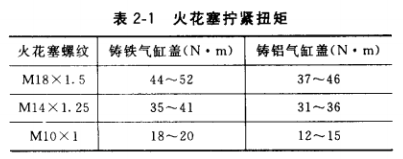
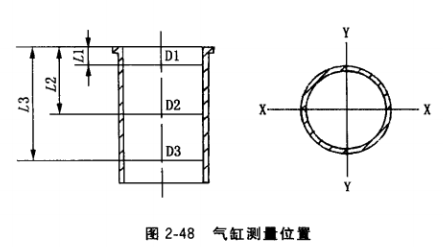
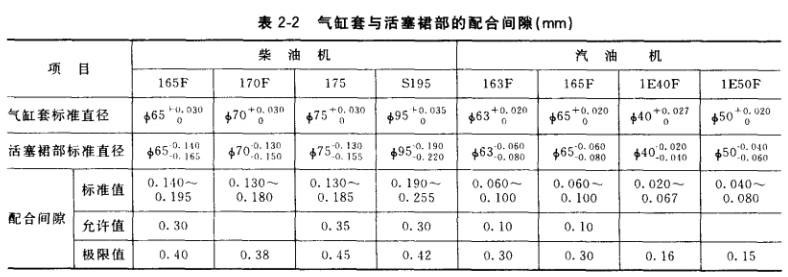
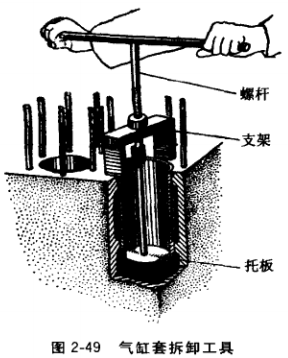
Diesel generators Common adjustment and maintenance method for diesel engine and gasoline engine of generator set 8. Gasoline engine gasoline pump maintenance If there is insufficient fuel supply to the gasoline pump, and the gasoline leaks out of the crankcase of the lower part of the pump body, the gasoline pump must be repaired in time. (1) Maintenance of inlet and outlet valves 1 The gasoline pump is removed from the gasoline engine, and the adhesion between the inlet and outlet valves and the seat should be checked. Use the mouth to suck the inlet pipe joint. Before the gas is not relieved, block the inlet pipe joint with the tongue and feel the suction on the tip of the tongue. It means that the oil inlet gasket, the pump body and the pump cover are well sealed. 2 Check that the oil outlet valve can be blown inward at the outlet pipe joint, and it is good to feel that it does not blow and does not leak. 3 It is also possible to connect the oil inlet pipe joint to the oil pipe, put the oil inlet pipe in the water, and push the oil pump rocker arm as the pump oil action in one hand. If the water is sprayed out from the oil discharge pipe port like a pillar, it is good. If the water sprayed is very scattered and boring, the gasoline pump should be repaired. 4 If the inlet and outlet valves have dirt to lift or stick them, the dirt should be cleaned up. If the valve and seat are still not tight after cleaning, the sheet type can be used for turning over, and the combined type should be replaced with new ones. The combined gasket has a great effect on the seal. If the gasket is damaged or the seal is not tight, it should be replaced. When loading, pay attention to the direction, the inlet and outlet valves should not be reversed to avoid losing the pump oil. When repairing a petrol pump with several inlet and outlet valves, each valve must be effective. If one fails, it will affect the fuel supply of the gasoline engine at high speed. (2) replacement of the membrane sheet. If the diaphragm of the gasoline pump is damaged, the gasoline will leak through the crankcase to dilute the oil (the oil level of the oil is increased, and it can be checked with the oil dipstick). If there is a hole under the pump body, the gasoline will leak out from the hole. not only does not pump enough oil, gasoline consumption will increase, so the diaphragm must be replaced. 1 When the diaphragm is damaged, if there is no diaphragm, a temporary remedy method can be used, that is, the broken parts of several layers of diaphragms are staggered, rearranged, and covered with each other for emergency use. 2 When replacing the diaphragm, clamp the diaphragm rod into the vise, remove the nut, and remove the old piece. If the diaphragm and the pressure plate are toughened, the rivet around the rivet head can be smashed with a trowel when disassembling, and punched out with a small punch, and then replaced with a new diaphragm. If the putter head is too short to be riveted after being twisted, it can be welded to the appropriate height, and then trimmed and then riveted with a file. When riveting the diaphragm, it should be noted that the eyelets on each single piece and the pump body should be aligned, and the eye should not be wrong. 3 The diaphragm spring is rusted, too soft or broken and must be replaced, otherwise it will affect the pump oil pressure. (3) Maintenance of the rocker arm. The gasoline pump rocker arm is in contact with the cam or the rocker arm and the diaphragm push rod are in serious contact (see Figure 2-43), which reduces the diaphragm stroke and affects the pump oil quantity. When the gasoline engine is running at high speed or full load, it will gasoline supply was insufficient. Excessive wear can be welded and then trimmed with a file. It can also be repaired in an emergency, that is , the appropriate gasket is removed at the joint of the gasoline pump and the cylinder for temporary use; It may also be linked to the rocker arm push rod and the diaphragm support, the pad according to the appropriate wire or cotter pin pumping amount, but attention should wrapped well, locked, to prevent falling. Regardless of surfacing or adding mats, be careful to maintain a certain gap , no Can be stuck, so as not to be installed on the cylinder block, damage the machine or not pump oil, when the gasoline pump is mounted on the cylinder block, the rocker arm should be inserted into the hole to be pushed close to the cylinder back (the eccentric of the camshaft) Should be shaken to the small face towards the rocker arm). Install a proper gasket between the fuel pump mounting flange and the cylinder platform. If the gasoline pump cannot be tightened against the cylinder face, do not hardly screw it to avoid damage to the pump flange or rocker arm. oil. This situation is mostly due to the fact that the gasket is too thin, and a properly ordered gasket should be replaced between the flange of the pump body and the cylinder block. After the restoration, the rocker arm and the eccentric wheel face should have a certain gap to avoid the shortage of pump oil. (4) Maintenance of air leakage and oil leakage. The joint surface between the pump body and the pump cover is not flat, which may cause air leakage and oil leakage. The fine abrasive cloth can be placed on the flat plate, and the pump body or the pump cover can be flattened by hand, and the joint surface of the pump body and the cylinder block can be smoothed by the same method. If the cork liner is damaged, the gasket should be replaced . If the rubber gasket is hard, it can be softened in hot water and then buttered. The new cork liner is also preferably soaked in hot water before use to prevent pressure. 9. Gasoline engine ignition coil inspection When the gasoline engine is in operation, it can be judged whether it is damaged according to the temperature of the ignition coil: the slight heat is good, and the hot hand indicates that the coil has been damaged. The suspected damaged ignition coil can be placed on a gasoline engine with a good ignition system for high-pressure spark inspection to determine if it is damaged. It is a common method to check the ignition coil with a test lamp (powered with 220V AC). (1) Inspection of low voltage circuits . Touch the two styli of the test lamp to the two terminals of “switching one power supply†and “switching†respectively. If the test light is on, it indicates that the additional resistance of the ignition coil is good, otherwise the resistance is blown. Touch the two stylus of the test lamp to the "switch" and the low-voltage wiring to the distributor. If the test light is on, it means that the low-voltage coil is not open, otherwise it means that the circuit has been disconnected. “幵关â€, switch-power supply †leads to the terminal of the low-voltage line of the distributor, no matter which terminal is touched by one stylus of the test lamp, the other stylus touches the outer casing, and the test light should not be illuminated. good. If the test light illuminated, ignition wire take explain iron, should be detected at the grounding, to repair or replace the ignition coil. (2) Inspection of high voltage circuits. One stylus of the test lamp is inserted into the jack of the high voltage line, as shown in Figure 2-44. The other stylus strikes the low voltage terminal of the distributor. If the test light is not bright, there is a small spark on the low voltage terminal. That is good. If there is no spark, it means that the ignition coil is open, and the ignition coil should be changed. 10. Gasoline engine distributor repair (1) Repair of distributor cap 1 Observe the cracks around the distributor cap. If there is a crack, it means it is damaged and should be replaced in time. â‘¡ the high points on the line disconnect the spark plug, the cover is opened and suspended distributor, close the contacts. Turn on the ignition switch, hold the high-voltage line with the hand , make each end 3 ~4mm away from the cylinder , and the other hand will move the contact arm to open and close, no matter which line the high-voltage spark is from . Skip, both indicate that the central high voltage jack and the splitter jack are powered. Checking the power between the high-voltage splitter jacks of the distributor is similar to the above check. First remove the stored high-voltage line on the distributor cover and insert the central high-voltage plug. The distributor cap breakdown leakage should be replaced, or it can be repaired by emergency method: after being wrapped with tape, the asphalt scraped off on the candle or battery can be melted and applied to the cleaned crack. In the socket of the 3 distributor's cover, if there is too much copper rust, it can be cleaned with a knife or a hacksaw blade to avoid the influence of conduction. 4 The central carbon column of the distributor cover must not be stuck in its seat hole. It must be moved up and down. If it is worn out, it should be replaced. If there is no new product, the carbon column on the old dry battery can be removed and processed for later use. The carbon column spring is too soft or Broken and must be replaced. (2) Maintenance of the fire head. Remove the splitter from the distributor, put it on the finger, and unplug the central high-voltage plug of the distributor cover so that the end is located at the middle of the metal part of the splitter head 3 ~4mm , and the split metal part separation cylinder 7 ~ 8mm , turn on the ignition switch, and move the contact arm by hand. If there is no spark between the metal parts of the fire head and the cylinder, the spark is weak, and the finger has a feeling of numbness, indicating that the fire head breaks through the leakage. Distributor rotor may be turned over on the cylinder head, the metal grounding portion, the end plug central high-pressure line from the distributor rotor located at an intermediate hole 7~8mm hand toggle contact arm, if If the spark is skipped, it means that the fire is broken, and the fire break should be replaced. (3) Maintenance of the power-off contacts. If there is oil on the contacts and the ablation is uneven, they should be cleaned or trimmed. Oil can be moistened with a clean cloth to clean gasoline, to be polished is not available ablation fine sandpaper or sand bar. If the ablation is severe, the contact can be removed and placed on the oil stone. Slightly rub the oil, hold it by hand, and pull it back and forth in parallel to smooth it. The thickness of the single-piece contact shall not be less than 0.5mm after wear , otherwise it shall be replaced. When the contacts are trimmed or replaced with new ones, the center line of the upper and lower contact faces must not be skewed, and the centerline offset should not exceed 0.2 mm, as shown in Figure 2-45 . Otherwise, it is easy to ablate because the contact surface is too small. If the bakelite bushings and top blocks of the movable contact arms are worn or damaged, they should be replaced with new ones. When installing, the bakelite bushing should also be lubricated with oil. The spring tension of the contact arm is insufficient and can be adjusted by bending the spring piece. When adjusting the contact gap, first open the distributor cover and shake the crankshaft so that the cam edge is turned to just the maximum distance of the contact arm. The contact gap is measured with a plug gauge, as shown in Figure 2-46. Generally, it should be 0.35~0.45mm. It is easy to insert with a 0.35mm plug gauge . It is appropriate to feel resistance when inserting a 0.45mm plug gauge. If it is inappropriate, it should be adjusted. After adjustment, tighten the fixing screws and eccentric screws and check again. Pay attention to the various corners of the cam when adjusting, such as uneven wear, can be trimmed according to the most wear. Sometimes the contact gap is not adjusted after switching to a new contact, mainly because the slot of the fixed contact is too short or the cam wear is too large. If the slot is too short, it can be slender with a round file. If the cam is too worn, it needs to be replaced with a new one. ( 4) Repair of other parts 1 The drive gear on the distributor shaft is worn or damaged, and should be replaced or repaired. If it is driven by the plug, the wear of the plug surface must not exceed 0.10mm. If the wear is serious, it can be repaired with a file after surfacing. The distributor shaft drive gear cross pin is loose, and the distributor shaft can be pushed up and down. If the upper and lower tilting clearance exceeds 0.08mm, it can be replaced between the distributor housing and the drive gear or the lower end fixing ring ( driven by the plug). Thick gaskets, then replaced with new pins and riveted. If the cross pin is not loose, but the shaft is swaying up and down, the cross pin should also be removed, and the washer should be installed . 2 The uniform wear of the angular angle of the distributor cam (measured by the vernier caliper) should generally not exceed 0.40mm, and the angular wear should be uneven, so that each corner will open the contact arm. When the gap is 0.05mm or more, the cam should be replaced. 3 Centrifugal regulator weight spring should be replaced if it is too soft or broken. The tension of the two magazines of some distributors is different. The purpose is to make the engine perform different centrifugation at different speeds. When checking the tension of the centrifugal spring, the distributor shaft is usually clamped on the vise , and the cam is pinched by hand. When it is rotated in the direction of its operation, it is loosened to the limit position, and the cam can be automatically returned. , indicating that the spring can work, otherwise the spring should be replaced. When the weight shaft and hole are worn out, the old shaft can be removed, the shaft can be machined according to the size of the hole, and then used. 4 When adjusting the ignition advance angle of the vacuum pre-ignition device, the gasket at the joint can be increased or decreased to adjust the tension of the diaphragm spring to change the ignition advance angle. The diaphragm of the vacuum pre-ignition device is well sealed and can be inspected by a mouth sucking. If the air leaks, it should be replaced. If there is no diaphragm, it can be replaced by a gasoline pump diaphragm for emergency use. 11. Gasoline engine spark plug repair and replacement Preferably the spark plug in the spark plug check checker cleaning. Generally, a half scraper can be used to grind a small scraper to scrape off the dirt on the spark plug. Wash it with gasoline. If it is too difficult to clean it, use a fire to bake it. Bake the coke between the electrodes (the temperature should not be too high to avoid damage to the insulator). When checking whether the insulator is broken down, put the cleaned spark plug on the cylinder head, open the distributor cover, and unplug the central high-voltage line on the cover to make contact with the spark plug core connection to make a flashover check. , as shown in FIG. 2-47, see where flashover between the electrodes of the spark plug. If there is no spark skip, but there is a spark skip from the internal insulator, which proves that the spark plug is good. When the breakdown of the spark plug insulator is not serious, it is not easy to find the problem by this method. On the spark plug tester, the spark plug is tested under a certain air pressure, and the result is more accurate. Generally speaking, the spark plug is normally removed from the engine cylinder head. The surface of the insulator and the two electrodes should be russet. If it is dark gray, it should be cleaned to keep it clean. After the spark plug is cleaned , the gap between the electrodes must be checked, which should generally be 0.60~0.70mm. Gap is too large, wood screwdriver peg pressure side electrode; gap is too small, with little La screwdriver to pry the side electrode, but can not pry the intermediate electrode, so as not to damage the insulator. After the spark plug is damaged, it is generally necessary to change the new product. When the new spark plug is screwed into the spark hole, it should be tightened according to the specified torque (see Table 2-1) . If the screw is too tight, the insulator may be broken and damaged, and the screw is too loose and the cylinder is not sealed to cause air leakage. The replacement of spark plugs for small gasoline generator sets is often encountered. It is best to use the original type of spark plugs when replacing. When you can't purchase the same type of spark plug, you can also substitute it. When you substitute it, you should follow two points: the spark plug thermal characteristics should be consistent, otherwise the porcelain core temperature can not maintain a certain value, which may cause premature combustion knock or spark plug fire. 12. Inspection of cylinder liner After long-term work, the cylinder liner often wears, scratches, abates and cracks on the working surface, causing the cylinder to leak and simmer, the power is reduced, the fuel consumption is increased, and it cannot work normally. The degree of cylinder wear is not uniform along the direction of piston movement. When the piston is at top dead center, the first piston ring opposing the maximum wear position, the smaller the worn down, is formed on the big small cone, while the first piston ring than a position almost without wear. The damage in the circumferential direction of the cylinder is also non-uniform. On the contact surface of the piston skirt and the cylinder perpendicular to the crankshaft direction, the wear is maximized due to the side pressure, and an irregular elliptical shape is formed on the cross section of the cylinder . Cylinder wear is overrun and is usually repaired by changing the cylinder liner. The cylinder liner must be inspected and identified before it is replaced. The method is as follows: ( 1) Visual inspection. Wipe the inner surface of the cylinder liner and carefully observe the presence of scratches, ablation, cracks, etc. When the naked eye can't see it, apply white powder to the inner surface of the cylinder liner. Wait for 1~2 hours before observing. If there is crack, the crack will show pale yellow stripes. ( 2) Inspection of wear conditions. The cylinder table (inner diameter dial gauge) can be used for measurement when conditions permit. The measurement generally selects 3 sections, as shown in Figure 2-48 . The first position is the position corresponding to the first piston ring at the top dead center (D1 ); the second position is at the middle of the cylinder (at D2), and the piston skirt is at the top dead center relative to the piston. Corresponding position; the third position corresponds to the position of the next piston ring (at D3) when the piston is at the bottom dead center. Each section is measured perpendicular to the axis of the crankshaft (X-X) and parallel to the direction of the crankshaft axis (YY). Based on the measured data, the roundness error, cylindricity error and maximum wear amount of the cylinder liner can be calculated . The half of the diameter difference measured in two directions on the same section is the roundness error of the section. The largest roundness error among the three sections is the roundness error of the cylinder, and the maximum diameter (D or YY) of the cylinder is upward (XX or YY). The half of the cross-sectional diameter difference is the cylinder cylindricity error, and the half of the difference between the maximum diameter and the nominal diameter is the maximum wear amount. The cylinder wear limits of various internal combustion engines are specified. Typically cylinder gasoline engine roundness error exceeds 0.05mm, cylindricity error exceeds 0.2mm; roundness error when the diesel engine cylinder exceeds 0.06mm, cylindricity error than 0. 25mm, the cylinder liner should be for replacement. If there is no cylinder table, you can also perform rough measurement calculation as follows: remove the cylinder coke and push the used first piston ring into the cylinder wall above the corresponding part of the piston ring (piston ring and cylinder) perpendicular to the wall), the opening gap measured as the standard value. Then use the piston to push the piston ring flat to the three measuring positions of the cylinder wall , measure the opening gap respectively, and then subtract the measured three opening gap values ​​from the standard value, and calculate the cylinder liner according to the difference. Position wear and roundness, cylindricity error: wear amount = difference between two opening gaps 14 3. 1416, the largest wear amount in the three sections is the cylinder roundness error, the maximum wear amount minus the minimum wear amount Cylindrical error for the cylinder. ( 3) Measurement of the clearance between the cylinder liner and the piston. The difference between the maximum diameter of the cylinder liner and the diameter of the piston skirt is the clearance between the cylinder liner and the piston. This clearance must be tested before and after repair. When the amount with no available plug experiences actual measurement. The piston is placed upside down in the cylinder liner, the piston skirt is in the middle of the cylinder liner, and a plug of appropriate thickness is placed between the bearing surface of the piston skirt and the cylinder wall, and then the plug gauge is pulled out, if there is some resistance, but If the pumping can be smoothly taken out, the thickness of the plug gauge is the matching gap between the cylinder liner and the piston. Several small diesel engine, gasoline engine fitted between the piston and the cylinder liner gap Table 2-2. Reasonable replacement of the cylinder liner should refer to the following principles: When the cylinder liner is cracked, partially damaged or severely ablated and scratched, it should be replaced; when the maximum wear of the cylinder liner exceeds the limit, even the roundness and cylindricity error are still allowed. Within the range of values, it should also be replaced; when the heat sink of the external cylinder of the air-cooled internal combustion engine is damaged by impact, etc., when the area of ​​the damaged part is more than 5 mm × 1 mm, and the internal combustion engine is obviously overheated during operation, the cylinder should be replaced. Body; when the cylinder sleeve wear amount and roundness, cylindricity error are within the allowable range, or one of the roundness and cylindricity exceeds the allowable value, if the pre-repair internal combustion engine is excluded from the possibility of air leakage from the valve and cylinder head, If the compression force is still good, you can use it with a full set of piston rings. If there is still a problem of poor compression, you should change the cylinder liner; push the new piston ring flat on the upper part of the cylinder liner so that the piston ring is at the uppermost position when it is working. Measurement The opening clearance, if the clearance has exceeded the limit, the cylinder liner should be replaced. 13. Precautions for the assembly and disassembly of the cylinder liner (1) The cylinder liner should be inspected and identified, and it must be removed when it is confirmed that it must be disassembled. (2) When removing the cylinder liner, it is best to use a special removal tool, as shown in Figure 2-49. If there is no special tool, you can knock it out with a hardwood stick. Never use hard metal to knock it out directly. (3) When changing the wet cylinder liner, first put the cylinder without the water blocking ring into the cylinder block, press it tightly, check the distance of the end face of the cylinder sleeve above the top surface of the cylinder block, the distance must meet the requirements, such as 175 The diesel engine is 0. 13 ~ 0.25mm, and the S195 diesel engine is 0. 04~ 0.17mm. If the distance is too large or too small, the copper gasket of the cylinder liner can be replaced or the end face of the cylinder liner can be processed and trimmed. (4) Before the wet new cylinder liner is pressed, a new rubber water blocking ring coated with sealant should be installed. The thickness of the water blocking ring should be uniform. After installing the tank, the groove should be 0.5~0.8 mm higher than the groove surface . Out of service. The best choice is too high or carefully re-trimmed to meet the requirements of joinery rasp, and then draw a screwdriver inserted between the water blocking ring child ring and the cylinder liner, the water blocking ring to prevent twisting, and tension is uniform. After installing the water blocking ring, apply a layer of soapy water on the surface (do not use oil). (5) Put the cylinder sleeve with the water blocking ring into the hole of the cylinder block. If there is a gap at the end of the cylinder sleeve, the gap should be on the side where the connecting rod swings, then press the cylinder sleeve or put the board on the board. Knock it gently and evenly with a hammer. (6) When installing the dry cylinder liner, do not apply oil to the inner wall of the cylinder liner and the inner wall of the cylinder block seat hole to avoid carbonization of the oil after work and affect heat transfer. (7) After the dry cylinder liner is pressed, it should be flush with the upper plane of the cylinder block, not lower than the upper plane of the cylinder block, and can be trimmed with a file when it is raised. (8) When the dry cylinder liner is installed, the pressure of the pressure is large. In order to prevent the cylinder from being deformed, the cylinder should be pressed in the order of the cylinder. After the pressure is completed, the inspection and measurement are carried out. If the inner diameter of the cylinder liner is found to meet the requirements, Boring or honing to meet the requirements. 14. Removal of scale and oil (1) Removal of scale. After long-term use of the internal combustion engine, scale will accumulate in the radiator tank and the cooling water jacket, which will narrow the cooling channel, hinder the circulation of water, cause poor heat dissipation, and affect the normal operation of the internal combustion engine. Therefore, when the scale is 1 ~2mm thick , it must be cleaned. „Glass can be cleaned with the prepared cleaning solution. The commonly used rinsing liquid formulations are: Formula 1 Caustic Soda (caustic soda) 750g, kerosene 150g, water 10L Formula 2 soda 1kg, kerosene 500g, water 10L Formulation 3. 2. 5% hydrochloric acid solution If there are aluminum parts in the internal combustion engine cooling system, the above acidic or alkaline washing liquid cannot be used, and it can be washed with a solution of water glass and soapy water. Cleaning step: Dispose of the cooling water in the internal combustion engine, close each water discharge switch, remove the thermostat, and inject the cleaning liquid into the cooling system. Start the internal combustion engine, run at medium speed for 5~10 minutes, heat the washing liquid, then stop, stay for 10~12 hours, start the internal combustion engine again, run at medium speed for 10~15 minutes, then stop and let the cleaning liquid cool off. Adding water to the water, the internal combustion engine runs at medium speed. According to the above washing process is repeated 2 or 3 times, then cooling water is injected, can be transferred to normal use. (2) Removal of oil stains. Most of the parts removed from the internal combustion engine are oily. There are many ways to clean the oil. Commonly used are alkaline water degreasing and organic solvent degreasing. 1 alkaline water degreasing. Generally, the 5% caustic soda solution is heated to 80 to 90 ° C, and the parts are boiled in the solution for 10 to 15 minutes. The formulation of the solution is as follows: Formula 1 caustic soda 0.75, sodium carbonate 5.0, trisodium phosphate 1.0, soap 0.15 Formula 2 caustic soda 2, trisodium phosphate 5.0, sodium silicate 3.0 A small amount of potassium dichromate may also be added to the solution to prevent rusting of the metal after degreasing. Caustic soda to prevent corrosion of aluminum, and most preferable to adopt containing 1.0% sodium carbonate and 0.05% potassium dichromate solution or an 0.4% sodium carbonate and 0.15% sodium silicate solution cleaning. The solution should be heated to 70 to 90 ° C while stirring. 2 organic solvent degreasing. Organic solvent washing effect is better . Easy to use, no need to warm, no damage to metal . But high cost and flammable. Commonly used organic solvents include gasoline, kerosene, and diesel. In recent years, three-gas ethylene and water-based cleaning agents have been commonly used to remove oil. 15. Removal of carbon deposits Certain parts of the internal combustion engine, such as cylinder heads, pistons, piston rings and valves, may accumulate a layer of lacquer-like deposits, which are a mixture of drain, oil coke and charcoal that are not completely formed by the combustion of fuel and lubricating oil. Mechanical and chemical methods are commonly used to remove carbon deposits. (1) Mechanical method. It is easy to remove with a wire brush or scraper, but it is not clean and will damage the surface of the part. ( 2) Chemical method. The charcoal is first softened with a decarburizing agent and then removed, so that the parts are not damaged. Several char withdrawal agent formulation as follows: Formula one paint remover 60%, ammonia 30%, ethanol 10% The composition of the paint remover is Ethyl Acetate (or amyl acetate) 7.5%, lactone 2.5%, ethyl drunk 20%, stupid 60%, paraffin 2%. This side does not have any adverse effects on steel, cast iron, aluminum and other materials, but ammonia is corrosive to copper. The carbon deposit needs to be soaked for 2 to 3 hours at room temperature. Formulation Formulation two two coal coal oil 22%, 8% gasoline, 17% turpentine, 15% aqueous ammonia (25% concentration), phenol 30% oleic acid 8% This formula has no corrosion to steel, iron and aluminum parts, but it is not suitable for copper parts. It is soaked for 2 hours when decarbonizing . Formulation Formulation three two harsh caustic soda 79% (concentration of 20%), 15% trisodium phosphate (concentration of 20%), 5% sodium silicate, 1% soft soap This formula is suitable for steel and iron parts and should not be used for non-ferrous metals. It should be heated to 90~100 °C during use and can be removed by soaking for 2~3 hours.
Menthol Crystal is an organic Fragrances, more specifically a monoterpenoid, made synthetically or obtained from the oils of corn mint, peppermint, or other mints. It is a waxy, crystalline substance, clear or white in color, which is solid at room temperature and melts slightly above.
The main form of Menthol Crystal 100% Natural occurring in nature is (−)-menthol, which is assigned the (1R,2S,5R) configuration. Menthol Crystals 99% has local anesthetic and counterirritant Ethylene-Vinyl Acetate qualities, and it is widely used to relieve minor throat irritation. Menthol also acts as a weak κ-opioid receptor agonist.
In organic chemistry, Menthol Crystal For Cosmetic is used as a chiral auxiliary in asymmetric synthesis. For example, Boric Acid Flakes sulfinate esters made from sulfinyl chlorides and menthol can be used to make enantiomerically pure sulfoxides by reaction with organolithium reagents or Grignard reagents. Menthol Crystals Food Grade reacts with chiral carboxylic acids to give diastereomic menthyl esters, which are useful for chiral resolution.
Menthol Crystal,Menthol Crystal 100% Natural,Menthol Crystal For Cosmetic,Menthol Crystals 99%,Menthol Crystals Food Grade HENAN LIHAO CHEM PLANT LIMITED , https://www.lihaoche.com
Diesel Generator | Diesel Generator Price / 2018-09-04 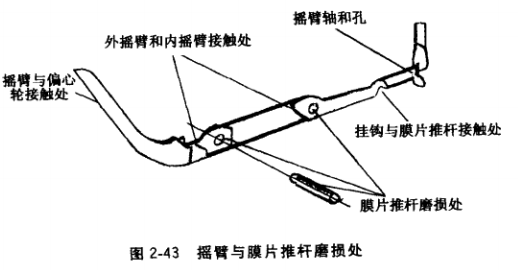
The wire is inserted in any split hole, one end of the split line is inserted in the adjacent jack on both sides of the central high voltage plug, and the other end is located 3 ~4mm away from the cylinder , and the contact arm is toggled. If a spark jumps to the cylinder, The two jacks have been broken. 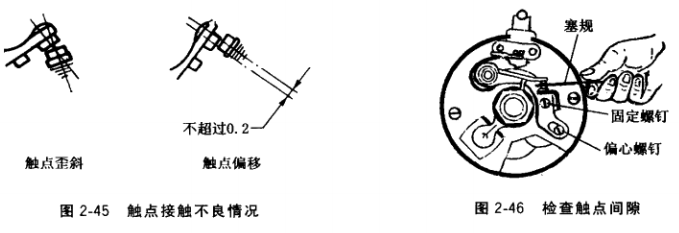
Common adjustment and maintenance methods for diesel engine and gasoline engine of generator set (2)
Common adjustment and maintenance methods for diesel engine and gasoline engine of generator set (2)
Previous:Common adjustment and maintenance methods for diesel engine and gasoline engine of generator set (1)